Blackberry Pistachio Dream Bars: A Luscious No-Bake Dessert with Layers of Flavor
Blackberry Pistachio Dream Bars: A Luscious No-Bake Dessert with Layers of Flavor is a delightful treat that offers a perfect balance of sweetness and nuttiness. This no-bake dessert is simple to prepare, making it ideal for gatherings, celebrations, or just a special indulgence at home. With its buttery crust, creamy layers, and fresh berry topping, this dessert will impress your guests and satisfy your sweet cravings.
Why You’ll Love This Recipe
- Easy to Make: With minimal preparation and no baking required, these bars can be whipped up in no time.
- Delicious Layers: Each bite features a rich combination of flavors from the pistachio cream, vanilla cream cheese, and fresh blackberries.
- Versatile Serving: Perfect for summer picnics, holiday gatherings, or as a refreshing dessert for any occasion.
- Beautiful Presentation: The vibrant colors of blackberries and chopped pistachios make this dessert visually appealing.
- Perfectly Creamy: The luscious texture of the layers creates a melt-in-your-mouth experience.
Tools and Preparation
To create these delicious Blackberry Pistachio Dream Bars, you’ll need some essential tools to aid in the preparation process. Here’s what you’ll need:
Essential Tools and Equipment
- 8×8 inch pan
- Mixing bowls
- Electric mixer or whisk
- Saucepan
- Measuring cups and spoons
Importance of Each Tool
- 8×8 inch pan: This size is perfect for making layered bars that are easy to cut into even pieces.
- Electric mixer or whisk: These tools help achieve the smooth consistency needed for the cream cheese layer and pistachio cream.
Ingredients
To make your own Blackberry Pistachio Dream Bars: A Luscious No-Bake Dessert with Layers of Flavor, gather the following ingredients:
For the Crust
- 1 cup crushed digestive biscuits
- 1/4 cup unsalted butter, melted
For the Pistachio Layer
- 1 cup shelled pistachios, finely ground
- 1/4 cup confectioners’ sugar
- 1/4 cup heavy cream
For the Cream Cheese Layer
- 1 cup cream cheese, softened
- 1/2 cup confectioners’ sugar
- 1 tsp vanilla extract
For the Blackberry Topping
- 2 cups fresh blackberries
- 1/2 cup granulated sugar
- 1 tbsp lemon juice
- 2 tsp cornstarch
Garnish
- 1/4 cup shelled pistachios, chopped
- Fresh blackberries for garnish
How to Make Blackberry Pistachio Dream Bars: A Luscious No-Bake Dessert with Layers of Flavor
Step 1: Prepare the Crust
Mix crushed biscuits with melted butter until combined. Press this mixture firmly into the bottom of a lined 8×8 inch pan. Chill in the refrigerator for about 20 minutes to set.
Step 2: Make the Pistachio Layer
In a mixing bowl, blend ground pistachios with confectioners’ sugar and heavy cream until smooth. Spread this mixture evenly over the chilled biscuit crust. Return to the fridge for another 20 minutes.
Step 3: Create the Cream Cheese Layer
Using an electric mixer or whisk, beat together softened cream cheese, confectioners’ sugar, and vanilla extract until creamy. Spread this mixture over the chilled pistachio layer and chill again until firm.
Step 4: Prepare the Blackberry Topping
In a saucepan over medium heat, combine fresh blackberries with granulated sugar, lemon juice, and cornstarch. Cook until thickened while stirring gently. Allow to cool slightly before spreading it over the cream cheese layer.
Step 5: Final Chill and Serve
Chill the entire pan in the refrigerator for at least 2 hours or overnight for best results. Before serving, garnish with chopped pistachios and additional fresh blackberries for an elegant touch.
Enjoy your decadent Blackberry Pistachio Dream Bars!
How to Serve Blackberry Pistachio Dream Bars: A Luscious No-Bake Dessert with Layers of Flavor
Blackberry Pistachio Dream Bars are delightful, creamy treats that can be served in various ways to enhance their flavor and presentation. Here are some serving suggestions to make your dessert experience even better.
For a Refreshing Twist
- Serve with Fresh Mint: Garnish each bar with fresh mint leaves for a burst of color and added freshness.
- Pair with a Scoop of Sorbet: Complement the bars with a scoop of lemon or raspberry sorbet for a refreshing contrast.
As Part of an Elegant Platter
- Create a Dessert Board: Place the bars alongside assorted fruits, nuts, and dark chocolate bites for a beautiful dessert spread.
- Include Cheese: Adding mild cheeses like mascarpone or ricotta can balance the sweetness and create an interesting flavor combination.
For Special Occasions
- Top with Edible Flowers: Decorate your bars with edible flowers to elevate their appearance for weddings or celebrations.
- Serve in Individual Portions: Cut the bars into smaller squares and serve in cupcake liners for easy handling at parties.
How to Perfect Blackberry Pistachio Dream Bars: A Luscious No-Bake Dessert with Layers of Flavor
To achieve the best results when making Blackberry Pistachio Dream Bars, keep these tips in mind.
- Bold Layering Technique: Ensure each layer is evenly spread before chilling. This will create distinct layers that look beautiful when served.
- Chill Properly: Allow sufficient chilling time between layers to ensure they set correctly. Aim for at least 2 hours total chill time.
- Use Room Temperature Ingredients: Make sure your cream cheese is softened properly. This helps create a smooth texture for the cream cheese layer.
- Adjust Sweetness as Needed: Taste the blackberry topping before adding it to the bars. Adjust sugar based on your preference and berry sweetness.
- Fresh Ingredients Matter: Use fresh blackberries for the topping, as they provide the best flavor and texture compared to frozen ones.
- Experiment with Nuts: Feel free to mix in other nuts if you like. Almonds or walnuts can add unique flavors and textures.
Best Side Dishes for Blackberry Pistachio Dream Bars: A Luscious No-Bake Dessert with Layers of Flavor
The right side dishes can elevate your dessert experience further. Here are some excellent options to consider alongside your bars.
- Bold Fruit Salad: A mix of seasonal fruits like strawberries, blueberries, and kiwi adds color and freshness to the meal.
- Creamy Yogurt Parfait: Layer yogurt with granola and fresh berries for a delightful companion that balances sweetness.
- Zesty Citrus Salad: Combine oranges, grapefruits, and a touch of mint for a refreshing side that contrasts nicely with the creamy bars.
- Nutty Granola Clusters: Serve crunchy granola clusters on the side to add texture and complement the creamy layers of the dessert.
- Chilled Herbal Tea: Offer iced herbal tea infused with hibiscus or chamomile for a soothing beverage option.
- Savory Cheese Platter: Include mild cheeses that contrast well with sweet flavors, enhancing your overall dessert experience.
- Dark Chocolate Shavings: Serve dark chocolate shavings as an optional garnish on plates for an extra indulgent touch.
Common Mistakes to Avoid
When making your Blackberry Pistachio Dream Bars, there are some common pitfalls to be aware of. Avoiding these mistakes will ensure a delicious and visually appealing dessert.
- Skipping chilling times: Each layer needs adequate chilling to set properly. Follow the recommended chilling times for best results.
- Not using fresh blackberries: Fresh blackberries enhance flavor and texture. Always opt for ripe, fresh fruit for the topping.
- Overmixing the cream cheese: Mixing too long can make the cream cheese layer too runny. Beat just until creamy for the right consistency.
- Ignoring ingredient temperatures: Using softened ingredients helps achieve smooth layers. Ensure cream cheese and butter are at room temperature before starting.
- Inaccurate measurements: Baking is precise; inaccurate measurements can ruin the bars. Use a kitchen scale or measuring cups for accuracy.
Storage & Reheating Instructions
Refrigerator Storage
- Store in an airtight container to keep them fresh.
- These bars can last up to 4 days in the refrigerator.
Freezing Blackberry Pistachio Dream Bars: A Luscious No-Bake Dessert with Layers of Flavor
- Wrap each bar in plastic wrap before placing in a freezer-safe container.
- They can be frozen for up to 3 months without losing flavor.
Reheating Blackberry Pistachio Dream Bars: A Luscious No-Bake Dessert with Layers of Flavor
- Oven: Preheat to 350°F (175°C) and warm for about 10 minutes.
- Microwave: Heat on low power for 15-20 seconds, checking frequently.
- Stovetop: Place on a low-heat skillet covered with a lid, warming slowly.
Frequently Asked Questions
What are Blackberry Pistachio Dream Bars?
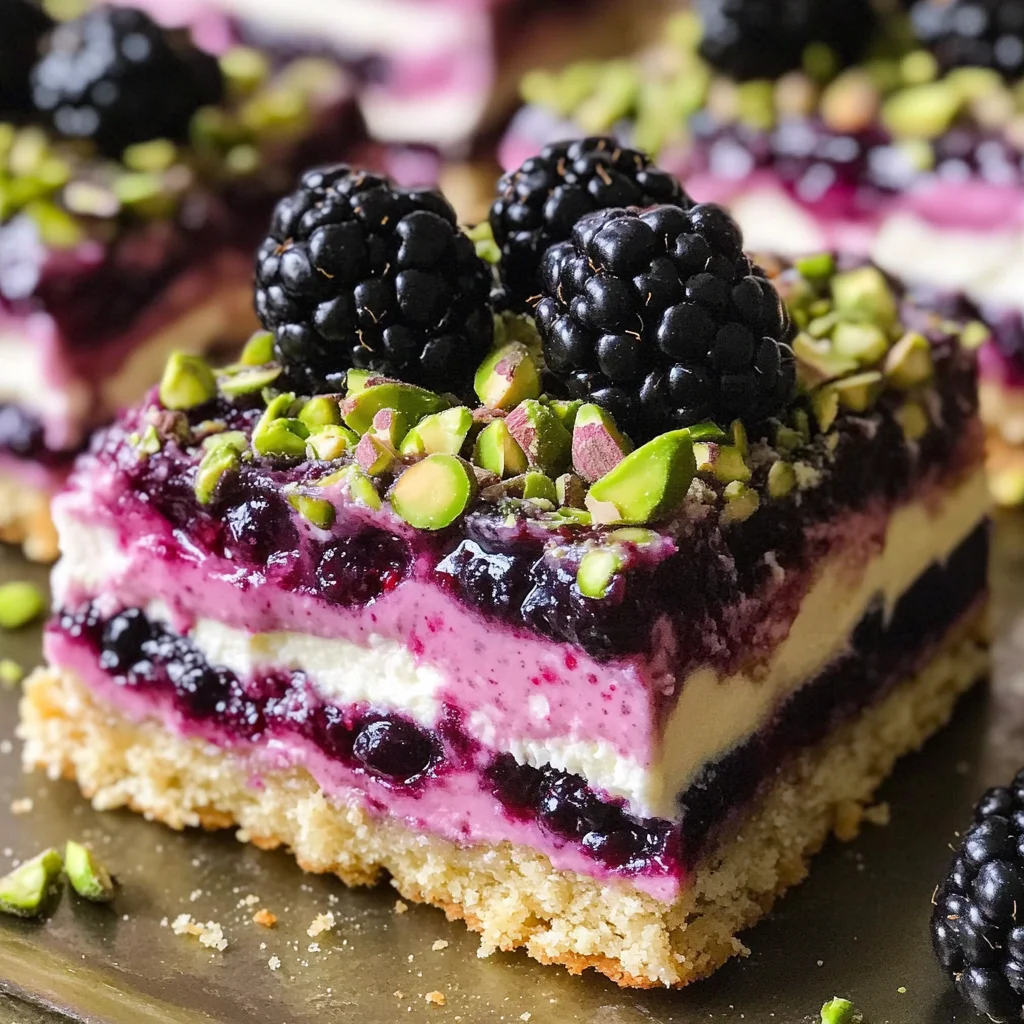
Blackberry Pistachio Dream Bars are no-bake dessert bars featuring a buttery biscuit crust topped with layers of pistachio cream, vanilla cream cheese, and fresh blackberry sauce.
How do I ensure my Blackberry Pistachio Dream Bars set properly?
Make sure to chill each layer adequately before adding the next one. This helps achieve the right texture and prevents layers from mixing.
Can I customize my Blackberry Pistachio Dream Bars?
Absolutely! You can add different fruits like raspberries or strawberries, or swap out nuts based on your preference.
Do I need to use heavy cream?
While heavy cream creates a rich texture, you can substitute it with coconut cream or a non-dairy alternative if desired.
Final Thoughts
These Blackberry Pistachio Dream Bars are not only luscious but also versatile, allowing you to customize them easily. The combination of textures and flavors makes them perfect for any occasion. Try making these delightful bars today and impress your friends and family!
Blackberry Pistachio Dream Bars: A Luscious No-Bake Dessert with Layers of Flavor
Indulge in the delightful layers of flavor found in Blackberry Pistachio Dream Bars, a refreshing no-bake dessert that combines the rich nuttiness of pistachios with the tangy sweetness of fresh blackberries. This easy-to-make treat is perfect for any occasion, whether you’re hosting a summer picnic, celebrating a special event, or simply craving something sweet at home. With a buttery biscuit crust and creamy layers, these bars not only taste amazing but also present beautifully, making them an impressive addition to your dessert table. Each bite offers a melt-in-your-mouth experience that will leave your guests wanting more.
- Prep Time: 30 minutes
- Cook Time: 0 minutes
- Total Time: 30 minutes
- Yield: Approximately 16 servings 1x
- Category: Dessert
- Method: No-Bake
- Cuisine: American
Ingredients
- 1 cup crushed digestive biscuits
- 1/4 cup unsalted butter, melted
- 1 cup shelled pistachios, finely ground
- 1/4 cup confectioners’ sugar
- 1/4 cup heavy cream
- 1 cup cream cheese, softened
- 1/2 cup confectioners’ sugar
- 1 tsp vanilla extract
- 2 cups fresh blackberries
- 1/2 cup granulated sugar
- 1 tbsp lemon juice
- 2 tsp cornstarch
- 1/4 cup shelled pistachios, chopped
- Fresh blackberries for garnish
Instructions
- Prepare the crust: Mix crushed biscuits with melted butter. Press into a lined 8×8 inch pan and chill for 20 minutes.
- Make the pistachio layer: Blend ground pistachios with confectioners’ sugar and heavy cream until smooth. Spread over the chilled crust and return to the fridge for another 20 minutes.
- Create the cream cheese layer: Beat together cream cheese, confectioners’ sugar, and vanilla extract until creamy. Spread over the pistachio layer and chill until firm.
- Prepare blackberry topping: Cook fresh blackberries with granulated sugar, lemon juice, and cornstarch until thickened. Let cool then spread over the cream cheese layer.
- Chill: Refrigerate for at least 2 hours or overnight before serving.
Nutrition
- Serving Size: 1 bar (50g)
- Calories: 150
- Sugar: 10g
- Sodium: 45mg
- Fat: 10g
- Saturated Fat: 3g
- Unsaturated Fat: 7g
- Trans Fat: 0g
- Carbohydrates: 14g
- Fiber: 1g
- Protein: 3g
- Cholesterol: 15mg