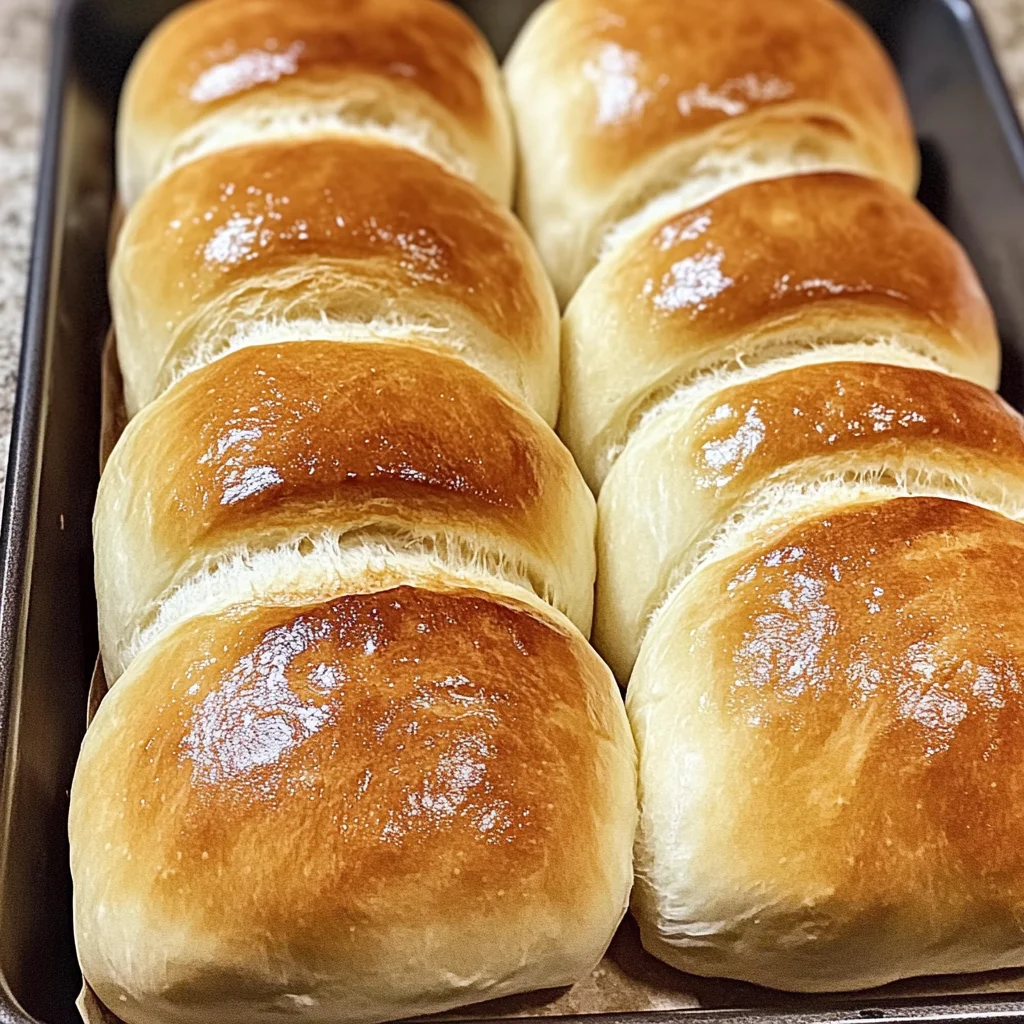
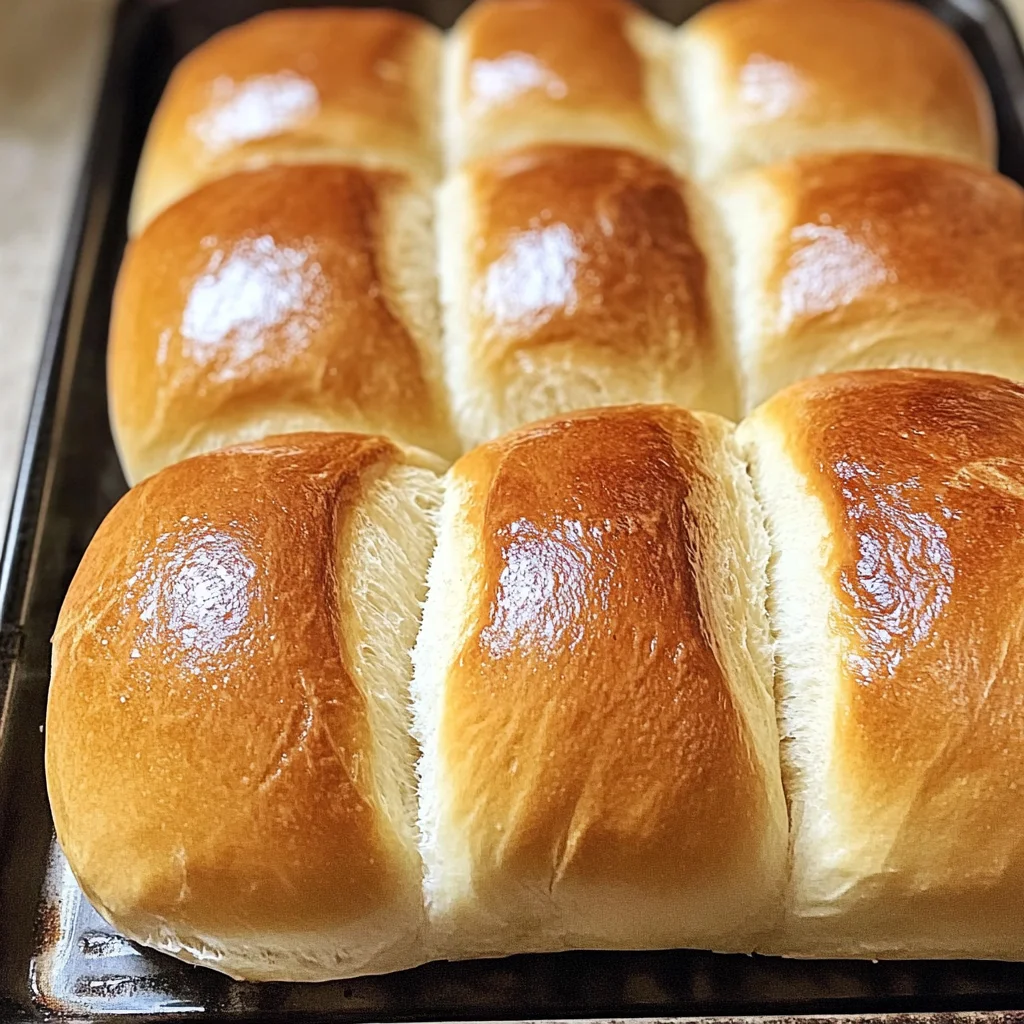
Handmade Sub Rolls
These Handmade Sub Rolls are not only soft and sturdy, making them perfect for any sandwich or hoagie, but they also deliver a delightful taste that will elevate your meals. Whether you’re preparing a picnic, hosting a game day gathering, or simply enjoying a cozy night in, these rolls will impress everyone at the table. Their unique qualities ensure they hold up well with various fillings and toppings, making each bite satisfying.
Why You’ll Love This Recipe
- Versatile Use: Perfect for sandwiches, grinders, hoagies, and more.
- Easy to Make: Simple instructions that guide you through each step.
- Soft Yet Sturdy: Holds up well with any filling without falling apart.
- Customizable Options: Add herbs or spices for extra flavor.
- Homemade Goodness: Enjoy the satisfaction of creating fresh bread from scratch.
Tools and Preparation
Before diving into the recipe, gather your tools to ensure a smooth baking experience.
Essential Tools and Equipment
- Stand mixer
- Mixing bowls
- Rolling pin
- Baking sheet
- Parchment paper
- Kitchen cloth
Importance of Each Tool
- Stand mixer: Makes kneading easy and saves time while ensuring proper dough consistency.
- Mixing bowls: Essential for combining ingredients efficiently and keeping everything organized.
- Baking sheet: Provides a flat surface for baking the rolls evenly.
- Parchment paper: Prevents sticking and makes cleanup easier after baking.
Ingredients
These Handmade Sub Rolls are perfect for any sandwich, grinder, hoagie, gyro (whatever they’re called)! Soft yet sturdy and delicious.
- 1 Cup Whole Milk (90℉)
- 2 ½ Tablespoons Granulated Sugar (30g)
- 2 Teaspoons, or 1 Packet Active Dry Yeast (11g)
- 3 Cups Bread Flour
- 2 tsp Fine Sea Salt (12g)
- 2 Eggs (Beaten)
- 3 Tablespoons Unsalted Butter (Cold, Cubed)
- 1 Egg White (Beaten – For Egg Wash)
- 1 Tablespoon Water (For Egg Wash)
How to Make Handmade Sub Rolls
Step 1: Bloom the Yeast
In a medium-sized bowl, add the warm milk, sugar, and yeast. Let it bloom for 5 to 10 minutes until frothy.
Step 2: Combine Dry Ingredients
As the yeast mixture blooms, combine the bread flour and salt in the bowl of a stand mixer.
Step 3: Mix Dough
Add the yeast mixture and beaten eggs to the flour and salt. Knead on low speed for about 3 to 5 minutes until a shaggy dough forms. Scrape down the sides of the bowl with a spatula as needed.
Step 4: Incorporate Butter
Add in the cold, cubed butter. Knead for an additional 8 to 10 minutes until the butter is fully incorporated and the dough is smooth. The dough ball should weigh approximately 880g at this point.
Step 5: First Rise
Turn the dough out onto a lightly floured work surface and roll it into a tight ball. Lightly grease a large bowl, turning the dough ball to coat it. Cover and let it rest for about 1 hour or until doubled in size.
Step 6: Shape Rolls
Turn the dough out onto a lightly floured work surface again and punch it down. Divide into six equal pieces (approximately 140g each) and roll into individual dough balls. Using a rolling pin, roll each ball into a rectangle about 9 inches wide by 5 inches tall. The thickness should be between ¼ to ½ inch. Starting with the long side, tightly roll into a loaf shape. Pinch end seams together until smooth. Place seam side down on a baking sheet lined with parchment paper.
Step 7: Second Rise
Cover the dough with a damp kitchen cloth or another baking sheet and let rise for an additional 30 minutes.
Step 8: Preheat Oven
While the dough is proofing, preheat your oven to 400°F.
Step 9: Prepare for Baking
Mix the egg white and water in a small bowl; gently brush over loaves. Using a lame or sharp kitchen knife, score each loaf about ¼ inch deep in three spots.
Step 10: Bake Rolls
Bake for about 15 to 20 minutes until golden brown or they register between 195°F -200°F internally on an instant-read thermometer. Remove from oven and transfer to a wire rack. Allow them to cool completely before slicing.
How to Serve Handmade Sub Rolls
Handmade Sub Rolls are incredibly versatile and can be enjoyed in various ways. Whether you’re crafting a classic sandwich or an innovative creation, these rolls provide the perfect base for delicious fillings.
Classic Sandwiches
- Turkey and Avocado: Layer slices of turkey breast with mashed avocado, lettuce, and tomato for a fresh, satisfying meal.
- Chicken Salad: Combine shredded chicken with mayonnaise, celery, and herbs for a creamy, flavorful filling.
Grinders and Hoagies
- Italian Grinder: Stack salami, turkey, pepperoncini, provolone cheese, and a drizzle of olive oil for an authentic Italian experience.
- Meatball Hoagie: Fill with hearty meatballs in marinara sauce topped with melted mozzarella cheese for a comforting treat.
Creative Gyros
- Grilled Veggie Gyro: Stuff with grilled zucchini, bell peppers, and eggplant along with tzatziki sauce for a Mediterranean twist.
- Spicy Chicken Gyro: Use shredded chicken marinated in spices served with lettuce and tomatoes drizzled with garlic sauce.
Perfect Dipping
- Soup Pairing: Serve alongside your favorite soups like tomato basil or vegetable minestrone for a complete meal.
How to Perfect Handmade Sub Rolls
To achieve the best results when making Handmade Sub Rolls, follow these helpful tips. Mastering the process will lead to consistently delicious rolls.
- Use Warm Milk: Ensure the milk is warm (around 90°F) to activate the yeast effectively; this helps the dough rise beautifully.
- Knead Thoroughly: Knead the dough until smooth to develop gluten structure; this gives the rolls their chewy texture.
- Let Dough Rise Properly: Allow enough time for the dough to double in size; this step is crucial for light and airy rolls.
- Score Before Baking: Scoring the dough allows steam to escape during baking; this prevents them from bursting open unpredictably.
- Bake Until Golden Brown: Look for a deep golden color and an internal temperature of 195-200°F; this ensures they are fully cooked.
Best Side Dishes for Handmade Sub Rolls
Pair your Handmade Sub Rolls with delightful side dishes that complement their flavor. Here are some excellent options:
- Garden Salad: A fresh mix of greens, tomatoes, cucumbers, and your favorite dressing adds brightness to any meal.
- Potato Chips: Crunchy chips bring texture contrast; choose flavored varieties like sea salt or barbecue for extra zest.
- Coleslaw: Creamy coleslaw provides a tangy crunch that balances rich fillings in sandwiches or gyros.
- Pasta Salad: A cold pasta salad mixed with vegetables and Italian dressing makes a refreshing accompaniment.
- Roasted Vegetables: Seasonal roasted veggies seasoned simply enhance the meal’s overall flavor profile while adding nutrition.
- Pickles and Olives: A small bowl of pickles or olives offers briny bites that cut through richer flavors in your sub sandwiches.
Common Mistakes to Avoid
Making Handmade Sub Rolls is a fun and rewarding experience, but it’s easy to make some common mistakes. Here are some tips to ensure your rolls turn out perfectly.
- Bold Yeast Activation: Not letting the yeast bloom properly can lead to dense rolls. Always wait until the mixture is frothy before using it.
- Bold Accurate Measurements: Using incorrect measurements, especially for flour, can affect dough consistency. Use a kitchen scale for precision.
- Bold Dough Handling: Overworking the dough makes it tough. Knead just until smooth and elastic, then let it rest as directed.
- Bold Proper Rising: Skipping the second rise can result in flat rolls. Be patient and allow time for the dough to double in size.
- Bold Oven Temperature: Baking at the wrong temperature can cause uneven cooking. Always preheat your oven thoroughly before baking.
Storage & Reheating Instructions
Refrigerator Storage
- Store Handmade Sub Rolls in an airtight container.
- They will last up to 3 days in the refrigerator.
Freezing Handmade Sub Rolls
- Wrap each roll tightly in plastic wrap and place them in a freezer-safe bag.
- They can be frozen for up to 3 months.
Reheating Handmade Sub Rolls
- Oven: Preheat to 350°F, wrap rolls in foil, and heat for about 10-15 minutes.
- Microwave: Place on a microwave-safe plate, cover with a damp paper towel, and heat for 15-20 seconds.
- Stovetop: Heat on medium-low in a skillet with a little butter for added flavor.
Frequently Asked Questions
How do I make my Handmade Sub Rolls softer?
To achieve softer rolls, ensure you use enough fat like butter in your recipe and avoid over-kneading.
Can I substitute whole milk with another liquid in Handmade Sub Rolls?
Yes! You can use almond milk or oat milk as alternatives while maintaining similar moisture levels.
How can I customize my Handmade Sub Rolls?
Feel free to add herbs or spices like garlic powder or Italian seasoning to enhance flavor.
What is the best way to slice Handmade Sub Rolls?
Use a serrated knife to get clean cuts without squishing the bread.
How long does it take to make Handmade Sub Rolls from start to finish?
The total time is approximately 2 hours and 10 minutes, including rising times.
Final Thoughts
These Handmade Sub Rolls are not only delicious but also versatile enough for any filling or spread you desire. Whether you’re crafting a hearty sandwich or serving them alongside a meal, these rolls will impress your guests. Don’t hesitate to customize them with your favorite herbs or toppings!
Handmade Sub Rolls

Handmade Sub Rolls are the perfect addition to any meal, offering a delightful blend of softness and sturdiness that holds up beautifully to your favorite fillings. Whether you’re crafting a classic sandwich or an innovative creation for game day, these rolls will impress everyone at your table. With their homemade goodness, you can customize them with herbs and spices for extra flavor, making each bite uniquely satisfying.
- Prep Time: 30 minutes
- Cook Time: 20 minutes
- Total Time: 50 minutes
- Yield: Makes approximately six rolls 1x
- Category: Bread
- Method: Baking
- Cuisine: American
Ingredients
- 1 cup whole milk (90°F)
- 2 ½ tablespoons granulated sugar
- 2 teaspoons active dry yeast
- 3 cups bread flour
- 2 teaspoons fine sea salt
- 2 eggs (beaten)
- 3 tablespoons unsalted butter (cold, cubed)
- 1 egg white (beaten for wash)
- 1 tablespoon water (for wash)
Instructions
- Bloom the yeast by mixing warm milk, sugar, and yeast in a bowl. Let sit until frothy for about 5-10 minutes.
- In a stand mixer, combine bread flour and salt. Add the yeast mixture and beaten eggs; knead on low speed for 3-5 minutes.
- Incorporate cold butter and knead for an additional 8-10 minutes until smooth and elastic.
- Shape dough into a ball, place in a greased bowl, cover, and let rise until doubled (about 1 hour).
- Punch down dough, divide into six pieces, roll into rectangles, and shape into rolls. Place seam side down on a baking sheet lined with parchment paper.
- Cover rolls and let rise again for about 30 minutes.
- Preheat oven to 400°F. Brush rolls with egg wash and score with a knife.
- Bake for 15-20 minutes until golden brown and cooked through.
Nutrition
- Serving Size: 1 serving
- Calories: 190
- Sugar: 4g
- Sodium: 300mg
- Fat: 6g
- Saturated Fat: 3g
- Unsaturated Fat: 2g
- Trans Fat: 0g
- Carbohydrates: 31g
- Fiber: 1g
- Protein: 6g
- Cholesterol: 60mg