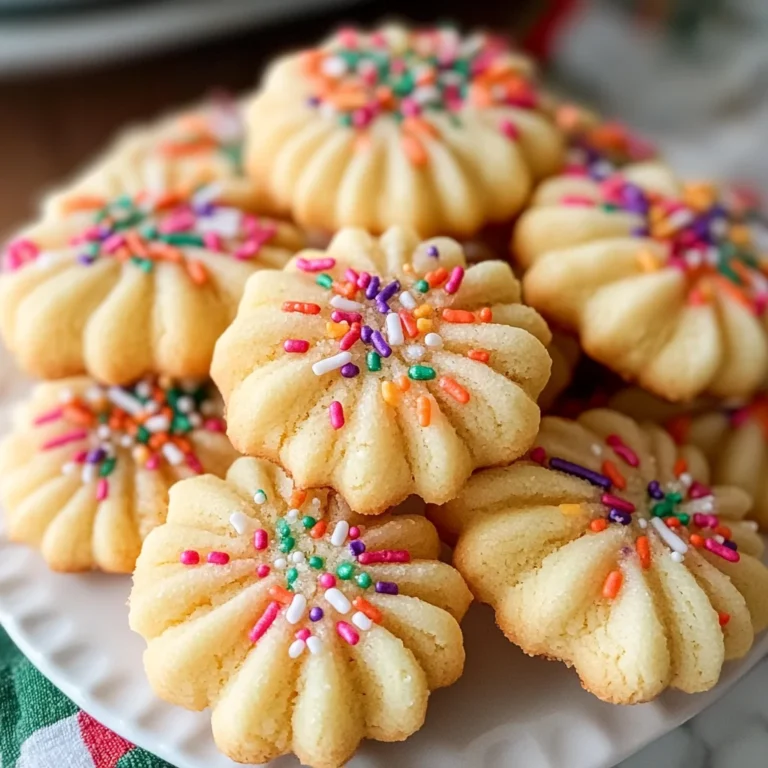
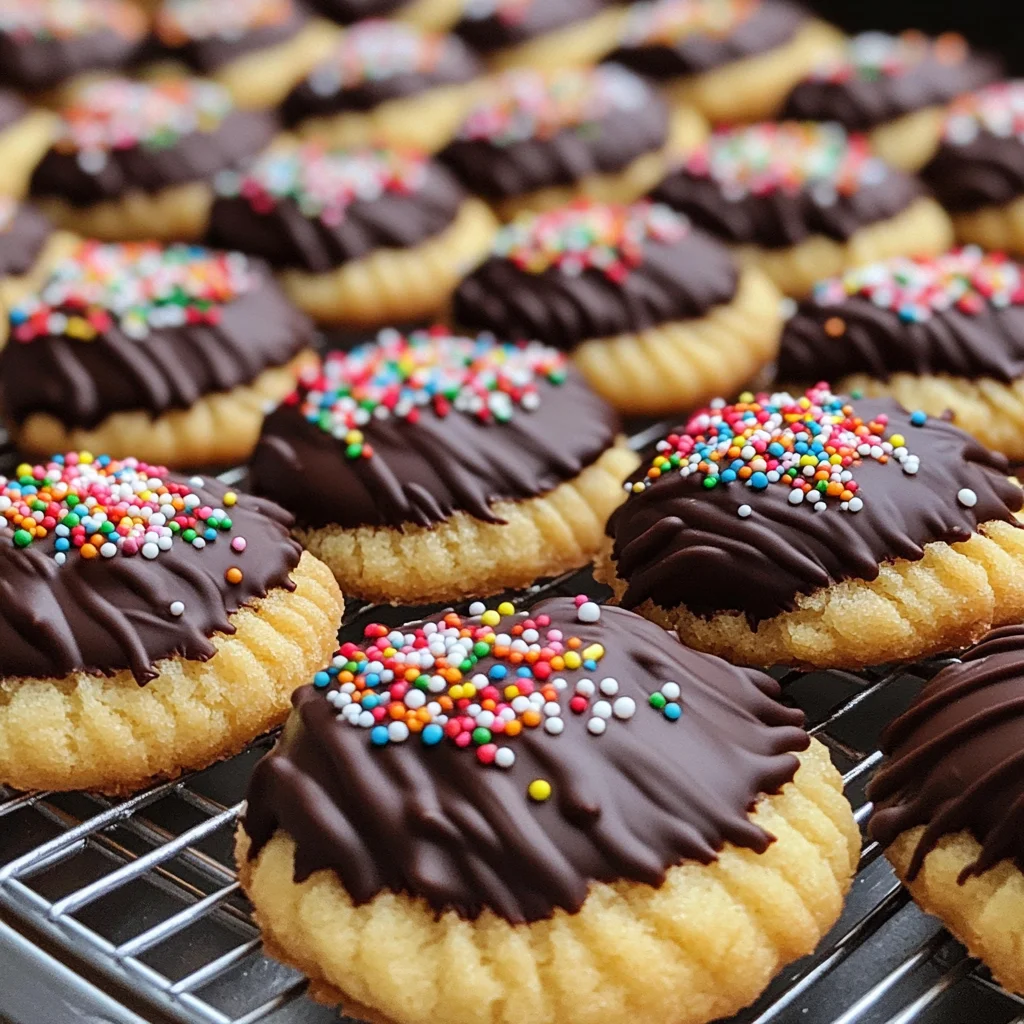
Danish Butter Cookies Recipe
These homemade Danish Butter Cookies are a delightful treat perfect for any occasion. With their crispy exterior and soft, buttery interior, they are sure to impress friends and family alike. Dipped in chocolate and sprinkled with festive decorations, these cookies not only taste amazing but also look stunning on your holiday dessert table. Enjoy them during Christmas festivities or as a sweet snack any time of year!
Why You’ll Love This Recipe
- Easy to Make: The simple ingredients and straightforward steps make this recipe perfect for bakers of all levels.
- Versatile Treat: Ideal for holidays, parties, or just a cozy afternoon snack – these cookies fit all occasions.
- Deliciously Indulgent: The combination of buttery flavor and chocolate adds a rich touch that everyone will love.
- Customizable Decorations: Use different types of sprinkles or toppings to create your unique cookie designs.
- Perfect for Gifting: Pack them in a decorative box for a thoughtful homemade gift that’s sure to be appreciated.
Tools and Preparation
Before you start baking, gather the necessary tools to ensure a smooth process. Having the right equipment can significantly enhance your baking experience.
Essential Tools and Equipment
- Stand mixer or hand mixer
- Piping bag with large piping tip
- Baking sheet
- Wire rack
- Heat-proof bowl
Importance of Each Tool
- Stand Mixer or Hand Mixer: Essential for creaming butter and sugar together until light and airy, which is key to achieving the perfect texture.
- Piping Bag with Large Piping Tip: This allows you to create beautiful swirls easily, giving your cookies an elegant shape.
- Baking Sheet: A sturdy surface to bake your cookies evenly; avoid using parchment paper for this recipe to maintain the desired texture.
- Wire Rack: Crucial for cooling the cookies properly after baking, preventing sogginess.
Ingredients
These homemade Danish Butter Cookies are traditional Christmas Cookies. Crispy outside and soft inside, they are dipped in chocolate and decorated with sprinkles for a classic festive look.
For the Dough
- 1 cup unsalted butter (room temperature)
- 2/3 cup granulated sugar
- 1 large egg (room temperature)
- 1 teaspoon vanilla extract
- 2 cups all-purpose flour
- 1/4 teaspoon salt
- 2 teaspoons milk
For the Topping
- 3 oz semi-sweet or milk chocolate
- 3 tablespoons sprinkles
How to Make Danish Butter Cookies Recipe
Step 1: Cream the Butter and Sugar
Using a stand mixer with a paddle attachment or hand mixer, cream together 1 cup butter and 2/3 cup granulated sugar for a few minutes. The mixture should be light and airy.
Step 2: Add Egg and Vanilla
Add 1 egg and 1 teaspoon vanilla extract. Mix again until well combined.
Step 3: Incorporate Flour and Salt
Add 2 cups all-purpose flour and 1/4 teaspoon salt. Mix on low speed until just combined.
Step 4: Adjust Dough Consistency
Add 2 teaspoons milk and mix until the dough reaches a pipeable consistency but is not runny. You can add more milk if needed; however, use as little as possible.
Step 5: Prepare Piping Bag
Transfer the dough to a piping bag fitted with a large piping tip.
Step 6: Pipe Cookies
Pipe 2-inch swirls onto a baking sheet, placing them about 3 inches apart.
Step 7: Chill Cookies
Place the baking sheet with piped cookies in the fridge for 15-20 minutes. This step helps maintain their shape while baking.
Step 8: Preheat Oven
Preheat your oven to 350°F (175°C).
Step 9: Bake the Cookies
Bake the cookies for about 15 minutes or until they turn golden brown on the sides.
Step 10: Cool Down
Remove from the oven and let them sit on the baking sheet for about 10 minutes before transferring them to a wire rack to cool completely.
Step 11: Melt Chocolate
While cooling, prepare the chocolate by melting it in a double boiler or microwave. Place chopped chocolate in a heat-proof bowl; microwave in increments of 20 seconds, stirring after each increment until fully melted.
Step 12: Dip Cookies
Dip two-thirds of each cooled cookie into melted chocolate. Place on parchment paper, decorate with sprinkles, and let dry completely before serving.
Enjoy your delicious homemade Danish Butter Cookies!
How to Serve Danish Butter Cookies Recipe
These delightful Danish Butter Cookies are perfect for various occasions, especially during festive gatherings. Here are some creative ways to serve them:
With a Warm Beverage
- Coffee: Pair your cookies with a hot cup of coffee to enhance their buttery flavor.
- Tea: Serve alongside your favorite herbal or black tea for a comforting treat.
- Hot Chocolate: Enjoy with rich hot chocolate for a cozy dessert experience.
For Celebrations
- Dessert Table: Arrange the cookies on a decorative platter as part of a dessert table during celebrations or parties.
- Gift Boxes: Package them in decorative boxes as gifts for friends and family during the holiday season.
- Cookie Exchange: Bring these cookies to a cookie exchange event; their unique look and taste will stand out!
As a Snack
- On-the-go Treat: These cookies are easy to pack for snacks while traveling or at work.
- Kids’ Lunchbox: Add a couple of cookies to children’s lunchboxes for a sweet surprise.
How to Perfect Danish Butter Cookies Recipe
To achieve the best results with your Danish Butter Cookies, follow these helpful tips:
- Use Room Temperature Ingredients: Ensure butter and egg are at room temperature for better mixing and texture.
- Don’t Overmix the Dough: Mix just until combined to keep the cookies tender and flaky.
- Chill Before Baking: Chilling the piped cookies helps maintain their shape while baking, resulting in beautifully formed treats.
- Check Oven Temperature: Use an oven thermometer to confirm it’s accurate; slight variations can alter baking times.
- Experiment with Sprinkles: Try different colors and shapes of sprinkles for various occasions and themes.
Best Side Dishes for Danish Butter Cookies Recipe
Danish Butter Cookies pair well with several side dishes that complement their sweet richness. Here are some great options:
- Fresh Fruit Salad: A mix of seasonal fruits adds brightness and freshness that balances the sweetness of the cookies.
- Cheese Platter: Include mild cheeses like brie or gouda, which contrast nicely with the cookie’s texture.
- Nuts & Dried Fruits: A selection of mixed nuts and dried fruits provides a crunchy contrast and healthy options alongside the cookies.
- Yogurt Parfait: Layer yogurt, granola, and fresh berries in cups for a delicious breakfast or snack option that pairs well with cookies.
- Ice Cream Sundae Bar: Set up an ice cream bar where guests can create their sundaes, enhancing the dessert experience with these cookies on the side.
- Chocolate Fondue: Offer melted chocolate for dipping along with fresh fruits and marshmallows to create an interactive dessert experience.
Common Mistakes to Avoid
Making Danish Butter Cookies can be a delightful experience, but there are a few common mistakes to watch out for.
- Boldly using cold butter: Using cold butter will not allow it to cream well with sugar. Make sure your butter is at room temperature for the best texture.
- Boldly skipping the chilling step: Not refrigerating the piped cookies can lead to spreading during baking. Always chill them for at least 15-20 minutes to maintain their shape.
- Boldly overmixing the dough: Overmixing can make the cookies tough instead of tender. Mix until just combined for that perfect soft texture.
- Boldly not measuring ingredients accurately: In baking, precision is key. Use a kitchen scale or proper measuring cups to ensure you get the right amounts.
- Boldly neglecting to use parchment paper: Not using parchment paper can cause sticking. Always line your baking sheet unless specified otherwise.
Storage & Reheating Instructions
Refrigerator Storage
- Store in an airtight container for up to one week.
- Ensure cookies are completely cool before sealing to avoid moisture buildup.
Freezing Danish Butter Cookies Recipe
- Freeze cookies in an airtight container or freezer bag for up to three months.
- Layer parchment paper between cookies if stacking to prevent sticking.
Reheating Danish Butter Cookies Recipe
- Bold Oven: Preheat oven to 300°F and warm cookies for about 5-10 minutes.
- Bold Microwave: Heat individual cookies on low power for 10-15 seconds until warm.
- Bold Stovetop: Use a skillet over low heat for a minute or two, turning occasionally.
Frequently Asked Questions
Here are some common questions about making Danish Butter Cookies.
What makes Danish Butter Cookies special?
Danish Butter Cookies are known for their crispy edges and soft centers, offering a delightful texture and buttery flavor that pairs well with coffee or tea.
Can I customize my Danish Butter Cookies Recipe?
Absolutely! You can add flavors like almond extract or incorporate nuts and dried fruits into the dough for added texture and taste.
How do I achieve a perfect swirl when piping?
Use a large piping tip and apply even pressure while piping onto the baking sheet. Practice on parchment paper first if needed!
How long do Danish Butter Cookies last?
When stored properly in an airtight container, these cookies can last up to one week at room temperature or three months in the freezer.
Final Thoughts
These Danish Butter Cookies are not only perfect for festive occasions but also versatile enough for any time of year. With their rich buttery taste and customizable options, you can create your unique twist on this classic recipe. Give it a try, and enjoy every delicious bite!
Danish Butter Cookies

Indulge in the delightful taste of homemade Danish Butter Cookies, a timeless treat that brings joy to any gathering. These cookies feature a perfect balance of crispy edges and a soft, buttery center, making them irresistible for all ages. Dipped in rich chocolate and adorned with colorful sprinkles, they not only taste divine but also add a festive flair to your dessert table. Whether you’re celebrating the holidays or simply enjoying a cozy afternoon snack, this easy-to-follow recipe is sure to impress your friends and family.
- Prep Time: 20 minutes
- Cook Time: 15 minutes
- Total Time: 35 minutes
- Yield: Approximately 24 cookies 1x
- Category: Dessert
- Method: Baking
- Cuisine: Danish
Ingredients
- 1 cup unsalted butter (room temperature)
- 2/3 cup granulated sugar
- 1 large egg (room temperature)
- 1 teaspoon vanilla extract
- 2 cups all-purpose flour
- 1/4 teaspoon salt
- 2 teaspoons milk
- 3 oz semi-sweet or milk chocolate (for dipping)
- 3 tablespoons sprinkles (for decoration)
Instructions
- Preheat your oven to 350°F (175°C).
- Cream together butter and sugar using a mixer until light and airy.
- Add egg and vanilla; mix until well combined.
- Gradually incorporate flour and salt at low speed until just combined.
- Adjust dough consistency with milk, ensuring it’s pipeable but not runny.
- Transfer dough to a piping bag fitted with a large tip and pipe swirls onto a baking sheet.
- Chill cookies in the fridge for 15-20 minutes to maintain their shape during baking.
- Bake for about 15 minutes until golden brown on the sides.
- Cool on a wire rack before dipping in melted chocolate and decorating with sprinkles.
Nutrition
- Serving Size: 1 cookie (approximately 20g)
- Calories: 100
- Sugar: 6g
- Sodium: 35mg
- Fat: 6g
- Saturated Fat: 4g
- Unsaturated Fat: 2g
- Trans Fat: 0g
- Carbohydrates: 10g
- Fiber: <1g
- Protein: <1g
- Cholesterol: 15mg